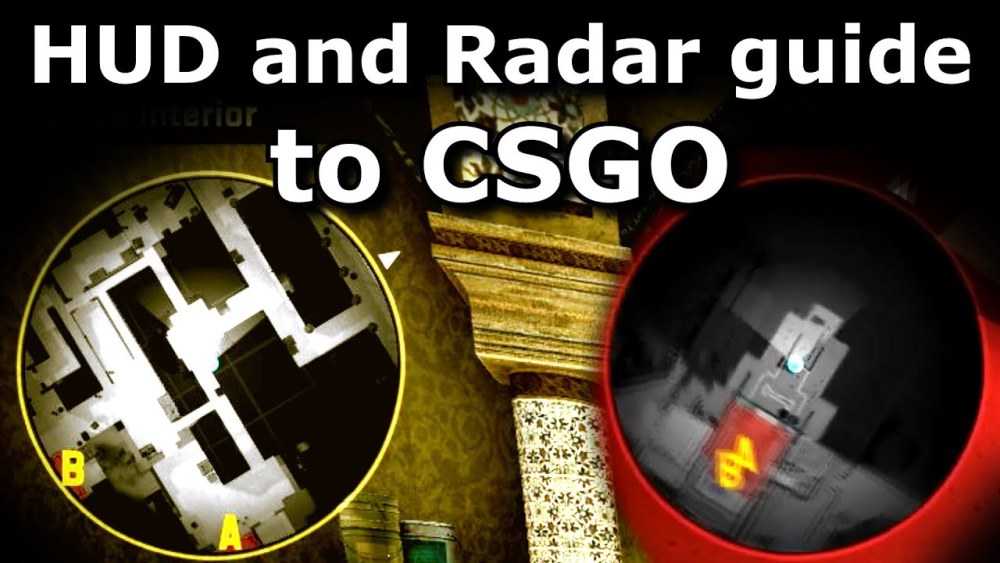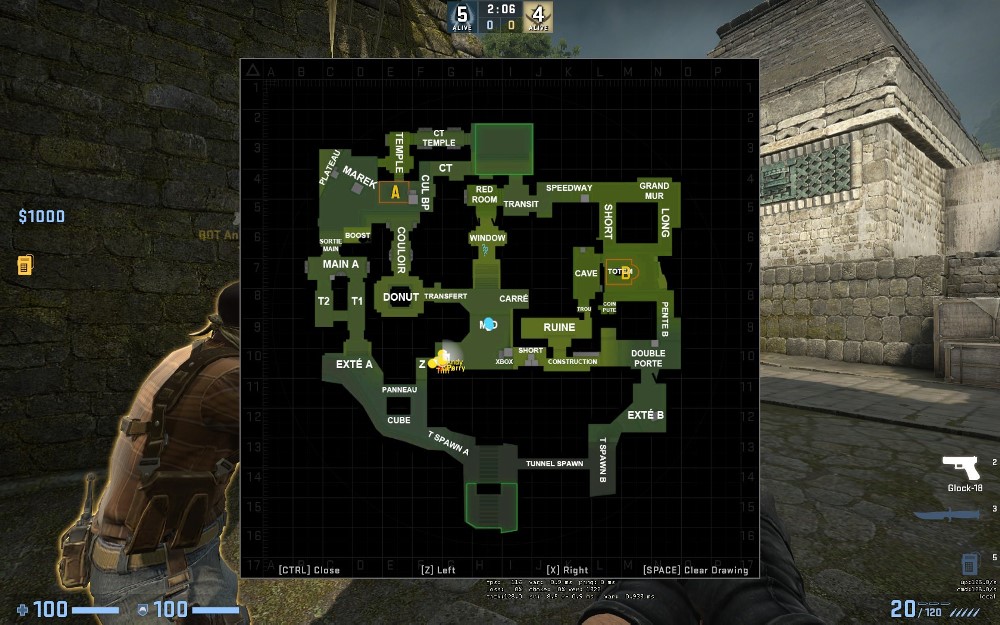
Here are some ways you can customize the interface and radar in CS:GO:
-
- HUD Customization: The HUD (Heads-Up Display) elements can be adjusted using console commands.
-
To access the console, go to Options > Game Settings > Enable Developer Console. Press the tilde (~) key to open the console and enter the following commands:
- cl_hud_color X : Changes the color of the HUD. Replace X with a number between 0 and 9 to choose a preset color.
- hud_scaling X : Adjusts the scale of the HUD. Replace X with a value (usually between 0.5 and 1.5) to resize the HUD elements.
-
Radar Customization: The radar can be customized to change its size, position, and other features. Here are some relevant commands:
-
-
- cl_radar_scale X : Adjusts the scale of the radar. Replace X with a value between 0.3 and 1.0 to resize the radar.
- cl_radar_icon_scale_min X : Sets the minimum scale of radar icons. Replace X with a value between 0.3 and 1.0.
- cl_hud_radar_scale X : Scales the radar elements, including player dots and the bomb icon. Replace X with a value between 0 and 1.
-
-
Radar Settings: CS:GO also has some in-game options for radar customization. Go to Options > Game Settings > Radar to access the following settings:
- Radar Size: Adjust the radar size using the slider.
- Rotate: Choose between “Rotate” and “North Up” modes for the radar.
- Radar Zoom: Enable or disable radar zooming when using sniper rifles.
- Custom Radar Images: It is possible to use custom radar images with a specific resolution. To do this, you’ll need to create custom radar images and replace the default ones in the game files. Please note that using custom files might be against the game’s terms of service and could lead to penalties or a VAC (Valve Anti-Cheat) ban. Exercise caution and ensure you are not violating any game policies.
Remember, modifying game files or using certain customizations might be against the game’s terms of service and could lead to penalties. Always make sure to check the game’s official policies and avoid any unauthorized modifications that could result in negative consequences.
Why do you need radar in CS:GO

Radar is an essential element in CS:GO (Counter-Strike: Global Offensive) as it provides players with crucial information about their surroundings and the positions of their teammates and enemies.
The radar is displayed on the screen, typically in the top-left corner, and it serves several important purposes:
- Map Awareness: The radar gives players an overview of the map layout and terrain. It displays the positions of teammates as green dots and enemies as red dots, allowing players to understand the overall positioning of players on both teams. This helps in making informed decisions about movement, positioning, and strategy.
- Enemy Positioning: Knowing the positions of enemies on the radar is invaluable during gameplay. It allows players to anticipate enemy movements, pre-aim at potential angles, and respond to threats effectively. Players can relay enemy positions to their teammates, enabling better coordination and teamwork.
- Map Control: The radar helps players establish map control by identifying areas held by their team and those controlled by the opponents. It assists in deciding where to push, defend, or rotate, based on the distribution of players on the radar.
- Bomb and Objectives: In game modes like “Bomb Defusal,” the radar displays the location of the bomb when it is dropped or planted. This information is crucial for both the Counter-Terrorist (CT) team to defuse the bomb and the Terrorist team to protect it. Additionally, the radar can display other objectives or map-specific elements relevant to the game mode being played.
- Communication: Radar information is often shared verbally between teammates to coordinate strategies and call out enemy positions. It helps maintain situational awareness even if a player cannot see an enemy directly, as long as the enemy is visible on the radar.
Overall, the radar is a vital tool for players to stay informed and make tactical decisions in real-time. It contributes to the strategic depth of CS:GO and enhances the teamwork required to succeed in competitive matches. Players who effectively utilize the radar alongside their in-game skills can gain a significant advantage over their opponents.
Map Awareness
Map awareness is a crucial concept in competitive video games, including CS:GO (Counter-Strike: Global Offensive). It refers to a player’s ability to have a comprehensive understanding of the game map and the positions of players, objectives, and other important elements within it.
Here’s why map awareness is vital in CS:GO and how it can benefit players:
- Positioning and Movement: Understanding the map layout allows players to make informed decisions about their positioning and movement. They can choose strategic positions that offer cover, favorable angles, or opportunities for surprise attacks. Proper map awareness helps players navigate the map efficiently and avoid potentially dangerous areas.
- Tactical Decision Making: With good map awareness, players can assess the flow of the game, the positioning of their teammates, and the whereabouts of enemies. This information is essential for making tactical decisions such as whether to push, hold a position, rotate to another bombsite, or retreat to safety.
- Enemy Predictions: Map awareness allows players to predict where enemies might be based on the last known information. This prediction skill helps in pre-aiming, pre-firing, and reacting quickly to enemy movements, giving players a significant advantage in engagements.
- Objective Control: In objective-based game modes like “Bomb Defusal” in CS:GO, map awareness is crucial for both attackers and defenders. Players need to know the locations of the bomb sites, where the bomb is planted, and where it might be taken or defended. Similarly, defenders must be aware of possible entry points for attackers and rotate accordingly.
- Team Communication: Map awareness facilitates effective team communication. Players can call out enemy positions, share relevant information, and coordinate strategies based on the collective understanding of the map. Good communication enhances teamwork and increases the chances of success in matches.
- Economy Management: In CS:GO, money management is vital. Knowing the map and its chokepoints helps players make wise economic decisions, such as purchasing appropriate weapons and utility, saving money when necessary, and ensuring the team’s overall financial stability.
- Adaptability: Map awareness allows players to adapt to changing situations quickly. If an opponent successfully executes a strategy, players with map awareness can adjust their approach, anticipate the next move, and counter it effectively.
Developing strong map awareness requires practice, experience, and observation. Players can improve their map awareness by actively studying maps, watching professional players’ matches, and playing regularly to gain familiarity with different situations and scenarios. Regularly checking the radar, communicating with teammates, and paying attention to the in-game information are all integral parts of honing map awareness skills in CS:GO.
Enemy Positioning
In CS:GO (Counter-Strike: Global Offensive), having accurate knowledge of enemy positioning is crucial for success. Understanding where enemies are located on the map allows players to make informed decisions and respond effectively to threats.
Here are some key points about enemy positioning and how to gather information about it:
- Information Gathering: Gathering information about enemy positions is a continuous process during the match. Players can acquire this information through various means:
- Visual Confirmation: Spotting enemies with your own eyes or through scoped weapons and relaying that information to your teammates.
- Sound Cues: Listening to footsteps, reload sounds, grenade throws, and other audio cues can help identify enemy movement and actions.
- Communication: Effective communication with teammates is vital. Sharing enemy positions and movements through voice chat or text chat can significantly impact decision-making.
- Radar: As discussed earlier, the radar displays enemy positions as red dots when teammates have spotted them, even if you can’t directly see the enemies.
- Game Sense: Developing game sense comes with experience. Over time, players can predict common enemy positions based on the map, the current game situation, and historical patterns of enemy behavior.
- Pre-aiming and Pre-firing: Knowing enemy positions in advance allows players to pre-aim at common angles and pre-fire when they expect an enemy to be present. Pre-aiming reduces reaction time and increases the chances of winning engagements.
- Peek and Trade: In CS:GO, peeking is the act of quickly exposing yourself to gain information or take a shot. It’s important to be cautious while peeking as enemies might be waiting to take you down. When teammates peek, be prepared to trade kills by quickly refragging the enemy if your teammate gets eliminated.
- Dynamic Information: Enemy positions are not static; they can change rapidly as the game progresses. Players need to adapt to new information and adjust their strategies accordingly.
- Mind Games: Skilled players may deliberately change their positions or use decoy tactics to mislead opponents. Being aware of this possibility adds another layer of complexity to understanding enemy positioning.
- Utility Usage: Understanding enemy positioning helps in using utility effectively. Players can throw grenades, flashbangs, or smoke grenades to hinder enemy movements and control certain areas of the map.
Remember, gathering and interpreting enemy positioning information is a skill that improves with practice and experience. Developing strong communication with teammates and maintaining constant vigilance are essential for successful information sharing and maintaining an advantage over opponents in CS:GO.
Map Control
Map control is a crucial concept in CS:GO (Counter-Strike: Global Offensive) and other tactical shooters. It refers to a team’s ability to establish and maintain control over different areas of the game map.
Here’s why map control is essential and how it can impact gameplay:
- Strategic Advantage: Map control provides a strategic advantage to the controlling team. By holding key positions on the map, the team can restrict enemy movement, predict their actions, and create opportunities for successful engagements.
- Access to Objectives: In game modes like “Bomb Defusal,” controlling specific areas of the map allows the team to gain easier access to bomb sites. This is particularly important for the Terrorist side, as they need to plant the bomb at one of the sites.
- Rotations and Flanks: With map control, a team can execute rotations and flanking maneuvers effectively. Controlling certain areas allows players to rotate quickly to support teammates or surprise the enemy from unexpected angles.
- Information Gathering: Map control enables players to gather information about enemy movements and positions. This information can be shared with teammates, leading to better decision-making and adjustments in strategy.
- Economy Management: Controlling areas of the map can impact the economy of both teams. For example, the team with map control may force the enemy to use more utility or lose expensive weapons when trying to regain control.
- Utility Usage: Map control facilitates the effective use of utility (grenades, smokes, flashes, etc.). Players can strategically deploy utility to hold or take control of areas, making it difficult for the enemy to challenge or retake those positions.
- Pressure on Opponents: By exerting map control, a team can put pressure on the opposing side, forcing them to react and adjust their strategy. This can create opportunities to exploit weaknesses or catch opponents off guard.
- Mid-round Adaptations: Teams with strong map control can adapt their strategies mid-round based on the information gathered. They can adjust their rotations, execute fakes, or change the focus of their attack based on the evolving situation.
- Time Management: Map control can impact the pace of the game. A team with map control can dictate the tempo and slow down the pace of the game to their advantage or speed it up to catch opponents off guard.
Successful map control requires a combination of individual skill, team coordination, and effective communication. Players must be aware of their roles, understand map dynamics, and make informed decisions about when to push, hold, or fall back from certain areas. It’s a dynamic aspect of CS:GO that can heavily influence the outcome of matches and separate skilled teams from the rest.
Bomb and Objectives
In CS:GO (Counter-Strike: Global Offensive), the primary objective for each team depends on the game mode being played.
The main game modes in CS:GO include “Bomb Defusal” and “Hostage Rescue.”
Let’s focus on the objectives and gameplay associated with the “Bomb Defusal” mode, as it is the most commonly played mode in competitive matches:
Bomb Defusal:
- Objective for Terrorists (T-side): The objective of the Terrorist team is to plant the C4 bomb at one of the designated bomb sites (A or B) and ensure it detonates successfully. Planting the bomb successfully grants the Terrorists a round win, regardless of whether they eliminate all the opposing players or not.
- Objective for Counter-Terrorists (CT-side): The objective of the Counter-Terrorist team is to prevent the Terrorists from planting the bomb or defuse the bomb if it has been planted. If the CTs eliminate all the Terrorists before the bomb is planted, they win the round. If the bomb is planted, they must defuse it within a specific time limit (usually 35 seconds) to win the round.
- Bomb Planting and Defusing: Only the Terrorists carry the C4 bomb, and any player on the Terrorist team can pick it up from the spawn area. Once a bomb site is chosen, a Terrorist can use the primary “Use” key (E by default) to begin planting the bomb. Planting takes a few seconds and leaves the player vulnerable, so teammates often protect the bomber during this time.
Counter-Terrorists, on the other hand, can defuse the bomb using the same primary “Use” key. Like planting, defusing takes several seconds and leaves the defuser vulnerable to enemy attacks. - Round Win Conditions: A round is won by either the Terrorists or Counter-Terrorists based on the following outcomes:
- Terrorists Win: The Terrorists win the round if the bomb is successfully planted and detonates before the CTs defuse it, or if they eliminate all CT players before the bomb is planted.
- Counter-Terrorists Win: The Counter-Terrorists win the round if they successfully defuse the planted bomb before it detonates, or if they eliminate all the Terrorist players before the bomb is planted.
- Switching Sides: After 15 rounds, the teams switch sides. The Terrorists become Counter-Terrorists, and vice versa. The team that reaches 16 round wins first or has the most round wins at the end of the match wins the game.
“Hostage Rescue” is another game mode in CS:GO, but it’s less commonly played in competitive settings. The objective in this mode is for the Counter-Terrorists to rescue hostages from the Terrorists’ custody and bring them back to designated rescue zones.
Keep in mind that CS:GO is a dynamic game, and strategies can vary depending on the map, team composition, and individual playstyles. Understanding the objectives and effectively coordinating with teammates are key to success in CS:GO.
Communication
Communication is a fundamental aspect of success in CS:GO (Counter-Strike: Global Offensive) and other team-based multiplayer games. Effective communication allows players to coordinate strategies, share information, and work together as a cohesive unit.
Here are some key points to consider about communication in CS:GO:
- Callouts: Callouts are short and precise verbal cues used to inform teammates about enemy positions and other relevant information. A good callout includes the location, direction, and any other distinguishing features. For example, on the map “Mirage,” a callout for the balcony area might be “Balc” or “Balcony.”
- Clear and Concise: Keep your callouts clear and concise to avoid confusion. Use commonly accepted callout names and try to avoid using vague or lengthy descriptions.
- Voice Communication: CS:GO has in-game voice chat, and using it is essential for efficient communication. Make sure your microphone is working correctly, and be ready to call out information during crucial moments.
- Be Positive and Supportive: Maintain a positive attitude during communication, even in challenging situations. Encourage your teammates and provide constructive feedback rather than blaming or criticizing.
- Listening and Reacting: Communication is a two-way process. Pay attention to your teammates’ callouts and adapt your gameplay accordingly. If a teammate spots an enemy, be ready to react and support them.
- Economy Discussion: Discussing the team’s economy is crucial. Plan your team’s buy rounds, eco rounds, and possible force buys together. Understanding the team’s financial situation can impact decision-making and strategies.
- Mid-Round Communication: Effective communication is not limited to the start of rounds. Mid-round calls are essential for adjusting strategies based on the evolving situation. Share information about enemy rotations and adapt accordingly.
- Timings: Share information about enemy timings, such as fast pushes or slow plays. This helps the team be prepared for potential rushes or execute specific strategies.
- Supporting the In-Game Leader (IGL): If your team has a designated in-game leader, respect their calls and support their decisions. A unified team under strong leadership can make better strategic choices.
- Stay Composed: During intense moments, it’s easy to get overwhelmed. Stay composed and focused, and avoid shouting or causing unnecessary distractions for your teammates.
Remember that CS:GO is a fast-paced game, and communication needs to be quick and efficient. Practice active listening and effective communication to enhance your teamwork and increase your chances of success in matches. Good communication can make the difference between a well-coordinated team and a group of individual players.


